First, choose your gloves. I say, the cheaper the better!

Second, choose a coordinating sweater.
Decide how long you would like your gloves to be and cut the sleeve off the sweater accordingly.

Put the sleeve on inside-out. (I like the cuff on the end so you have a nice finished look and they stay up better.) Pin the sleeve so it fits snug on your arm. Careful, don't poke yourself!

Follow the pins and sew a new seam along the sleeve.
Try it on and make sure it works, then trim away the excess fabric.

Next, put the glove inside the sleeve so the right sides are together and the edge of the cuff and the raw edge of the sleeve match up.

Pin all the way around, stretching the glove a little as needed.

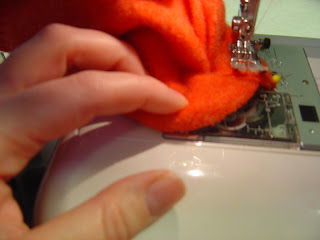
Now things get a little tricky. First set your sewing machine to a large straight stitch (on my machine I use a 3.0 whatever that means!) Since the glove won't fit around the arm of your machine, fold the edge of the sleeve/glove towards you as shown.


Decided where you want your seam to be. I think if you sew above the "cuff" of the glove it looks more like they go together, in the middle of the cuff gives the pieces more separation. Either way is great, its totally up to you. Once you've decided this, stick the sleeve/glove under your foot and lower the presser foot. Now make sure you only have one layer of sleeve/glove under the foot. Slowly sew around the circle, stopping occasionally to shift everything and continue to make sure you aren't sewing through too many layers.


Turn right side out and try it on. You'll notice quickly why you need to do the next step! Fold the sleeve portion up to expose the raw edges. Hand sew the edge of the cuff of the glove to the raw edge of the sleeve. I use a quick and simple whip stitch. Be sure to keep your hand inside the sleeve while you are doing this so you can make sure you are only catching one layer with your needle.


And ta-da! They are finished. If you want them to be! I think it would be fun to embroider on the glove or the sleeve to help coordinate the combo. This brown-orange pair especially could use a little something I think!

So, there you have it. If you still can't get this to work (and who can blame you with these instructions!) you could try this alternative.

On this set, I sewed up the side seam in the sleeve as I did above, only this time the sleeves are a bit longer to cover your hands. Then I just cut out the spot my thumb was trying to stick out of and they were done. I added a little stitching around the edges to make them look a little more finished.
These work great over gloves or on their own.

Please let me know if you have any questions!


9 comments:
You are leading the pack in cute and functional felted wool projects. Brilliant!!!
You're a freaking genius face! I just LOVE 'em!
thanks for the tutorial! that is an awesome idea. LOVE that green blue gray stripey combo...fantastic. :)
great idea! I might have to try the second option. My hands get so cold in the winter when I am sitting at the computer typing and stuff. Maybe this would help!
Gosh you are getting a lot done! I love all of your felted quilt projects. I have been wanting to make me a pair of the fingerless gloves. My fingers get cold in the evening when I am hand sewing...
Thanks for the tutorial! Mine are here: http://my45thyear.blogspot.com/2008/02/almost-there.html#links
Just had to let you know that your post has now saved me lots of time trying to figure out how to make long gloves for my daughter's Halloween costume!
They will need boots too and I think I can use this same idea for the kind of boots that cover your shoes on the top side.
Ah, Halloween costumes, so fun!
Interesting post you got here. I'd like to read more concerning this matter. Thanx for giving that info.
Joan Stepsen
Computer geeks
This is such an inventive and creative way to make gloves!
Post a Comment